

Some time ago I shared with you pictures of ort boxes I had made to give to my stitchy friends. Many of you asked via my comments where you could find the instructions. They were given to me by my good stitchy friend Kathy who also talked me through making my first one. Since I've finally got the time I thought I'd put together a step-by-step photo tutorial for you. If a step seems unclear please don't hesitate to contact me and I'll make the adjustments to these instructions as soon as possible.

Supplies needed: Wallpaper border or wallpaper, ruler, scissors, pencil and glue stick

Cut a piece of wallpaper border 10 inches long

Cut your 10 inch piece 6 inches wide, you should now have a piece 10 inches by 6 inches

With your pencil mark horizontal and vertical lines every two inches on the good side of the paper

Wallpaper border marked with 2 inch by 2 inch squares

Fold along horizontal lines

Fold along vertical lines

DO NOT MARK YOUR PAPER THIS IS JUST TO SHOW WHERE TO CUT!!!
Cut slits along bottom where indicated by dark black lines. Cut slits on right hand side where indicated by dark lines. Cut out 2 inch by 2 inch square in top right hand corner marked "cut out". Consider where this square is cut out the "top" of the paper.

This is how your paper should appear after slits have been cut and corner has been cut out

DO NOT MARK YOUR PAPER AS SHOWN HERE THIS IS MERELY A GUIDE TO SHOW YOU
Fold your paper diagonally corner to corner of each of the 2 inch by 2 inch boxes you drew on the paper in one direction as show (top two rows only not the bottom flaps)

DO NOT MARK YOUR PAPER AS SHOWN HERE THIS IS MERELY A GUIDE TO SHOW YOU
Fold your paper diagonally corner to corner of each of the 2 inch by 2 inch boxes you drew on the paper in the opposite direction (top two rows only not the bottom flaps)

Your paper should look like this after you've done all of the diagonal folds each 2 inch by 2 inch box should have an "X" inside it

You're now ready to start constructing the box. At this point top and bottom become very important.

Fold the bottom right hand corner back

Glue it to the flap it folds behind

Just to be obvious ;-)

Your piece should look like this from behind when flap is glued down this will be the inside bottom of your box

Flip your paper back over it should now look like this

Fold the top row over so that the wrong sides are touching

The back should look like this

The flap on the far right hand side, it is the tab you will tuck in to make the box

Fold to fashion a square/box

Tuck the tab in between the two layers of paper

Tucking tab in between two layers of paper

Sometimes the tab doesn't fit in evenly/snugly this is why I don't glue it right away

If necessary trim a little off of the tab

Tab now fits in nicely

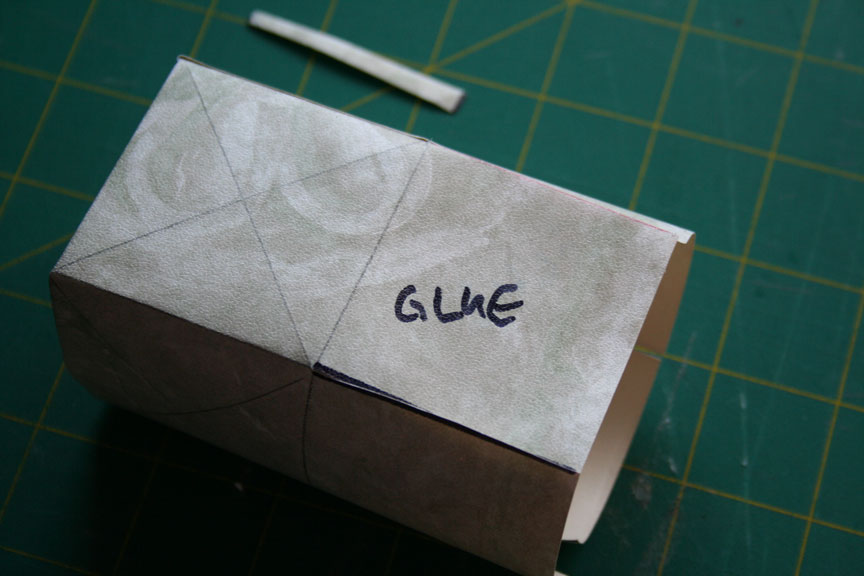
Unfold your box and on the back side put glue in the top right hand box and the one below it, this will secure the tab and keep the box together when you re-fold your box.

Re-fold your box, inserting the tab where you put glue, put a little pressure with your fingers on the area where you slid in the tab to make it stick!

Locate the one flap on the bottom that has the good side of the paper on both sides (the other three will be one side only, you glued this earlier on)
Put glue on the outside of the flap you just located (that has the wallpaper pattern on both sides)

Fold down the double sided flap you just put glue on

Fold a flap on top of the glued, double sided flap. Apply pressure with your fingers to make sure it gets glued down

Now put glue on top of the flap you just folded down

Fold another flap down on top of the glue

Glue the flap you just folded down, again use your fingers to put pressure so it sticks

Fold the last flap down, and use your fingers to put pressure so it all sticks together! Look, its a box!

Turn your box right-side up

The diagonal lines you folded earlier will aid in collapsing the ort box. The first time your box may need a little persuading/forcing to collapse.

There you go, a collapsed ort box, from now on it'll be a lot easier to collapse its just the first time that's tricky!
Congratulations! You've done it, you've made a collapsible ort box!
25 comments:
Fantastic tutorial, Dani! Thanks so much! I love your kitten helper there. =)
As one of the people who bugged you I say a great big THANK YOU! for the instructions. I can't wait to try this.
I like your little helper in the third picture. :-)
Very cool --- I love mine!
Thanks for the ort box AND the tutorial.
Excellent tutorial! I'll have to search my parents house for some left over wallpaper. :)
I love the pic of Zeus helping :)
Great tutorial.
What a great tutorial, so easy to follow.
Great tutorial Dani with really clear instructions and photos. I will be trying this, thanks.
These are great little boxes, love the one that I received from you Dani.
I'm going to try that. Years ago I had a little leather coin purse that folded up like that, I guess it must have been made the same way
Thanks for the tutorial Dani! I will definitely have to give this a try.
These instructions are amazing! Thank you. I just had one small problem in that neither of cats wanted to be feline helpers like yours, so I had to do it myself! LOL!
Dani-I'm a little confused with step 3-are we supposed to have our own version of Zeus to help us out? :) Such a cute little one!
Great instructions!
-Jen
Hi Dani - thanks so much for swinging by my blog earlier today!
Love the tutorial - I can't wait to get an hour of free time to try this out. I even think that I have some great paper at home to work with. :-) Thanks a bunch - very cool and the instructions look perfect!
Awesome tutorial Dani, very easy to follow. Can't wait to give it a try and then use it to sort and contain my orts again which I have been neglecting. Love the helper but hope mine decide to stay well away :) as they anything but helpful.
It is so interesting! Thank you!
Fantastic tutorial. I have some wallpaper samples I can practise on.
Does a small child work as well as a kitten or does it have to be a kitten?
Amazing! and so brilliant, thanks
Great tutorial thanks Dani. Just made my first one & although the box & I had a few arguments when it came to the collapsing we got there in the end.
Good job..... they are great for traveling..I've made a few and love them!!!
OH this is so neat! Now to find some wallpaper so I can give it a try.
I use mine all the time and my Aunt asked the other day how it was made - now I can just point her here! Thanks Dani!
Love this! Thanks ;)
I have been looking for a tutorial for making a collapsible orts box for years.......now it is May 2017 and I found yours! Excellent description and beautiful helper! Thank you!
Becky In FL
I've seen an ort box made with fabric. Do you think this can be done using your pattern or should another pattern be used?
Post a Comment